Showing posts with label Main Dish. Show all posts

Friday, September 7, 2012

Ethiopian Chicken w/Split Peas

Who knew a Jew from South Jersey could make a mean Ethiopian meal.  Tasty, tasty treat my fellow nommers...

Ethiopian Inspired Chicken
Prep time:  15 min
Cook time:  60 min
Serves: 2


Ingredients

  • 2 boneless, skinless chicken breasts (6 oz)
  • 1/2 (medium) bell pepper(s), chopped into bite size pieces   
  • 1/2 small uncooked onion, chopped into bite size pieces   
  • 1 cup(s) fresh mushroom(s), chopped
  • 2 cup(s) low sodium vegetable broth

  • 1 tsp olive oil
  • 1 Tbsp curry powder   
  • 1 tsp garlic powder   
  • 1 tsp garlic powder  
  • 1 tsp ground cumin
  • 1 tsp paprika  

  • 1/2 cup uncooked split pea
  • 1 garlic clove, minced
  • 2 Tbsp onion(s), finely chopped
  • 1/2 tsp ground ginger
  • 1/2 tsp ground turmeric
  • 1/8 tsp black pepper

Directions


Begin by coating the chicken with olive oil and various spices (minus the ginger and turmeric).  Let marinate while you complete the next steps.

Cook split peas according to directions (2 cups of water). Let simmer for 30 minutes, after which add the miced garlic, finely chopped onions, ginger and turmeric. Let simmer an additional 30 mintes.

With 15 minutes remaining, begin to cook the chicken (3 minutes on each side). Add the remaining veggies in a pan with non-stick spray for 4-5 minutes. Add broth and chicken to pan. Cover and let simmer for an final 5 minutes.  Pour extra broth over chicken and split peas.  Enjoy!

Thursday, September 6, 2012

Portobello "Philly Cheesesteak"

So as much as I hate to admit it, yes, I am a Philly girl born and raised - well, South Jersey... but close enough.  While that may not have influenced my sports preferences (GO YANKEES), it sure did influence my taste in food.  That's why when I saw a recipe on Eating Well's website for a Portobello Mushroom Cheese Steak I had to try it!  Friends, it did not disappoint.  The only thing better is a nice ole steak from Pat's in Philly.  

This was Slightly Adapted From Eating Well: "A vegetarian's version of Philly's famous cheese steaks."


The picture really does not do it justice... YUMMY
Ingredients
  • 3/4 bell pepper, thinly sliced
  • 2 portobello mushrooms, sliced (gills and stem removed*)
  • 1 small onion, sliced
  • 1 tsp olive oil
  • 1 tsp ground oregano (1 tablespoon if using fresh)
  • 1/4 tsp pepper
  • 1/2 Tbsp whole-grain wheat flour
  • 1/3 cup vegetable broth
  • 1/2 Tbsp low-sodium soy sauce
  • 1 1/2 oz reduced fat provolone cheese (preferably use the thin slices, but can use shredded)
  • 2 Whole Wheat Rolls, split and toasted


Directions
  1. Heat oil in a large nonstick skillet over medium-high heat. Add onion and cook, stirring often, until soft and beginning to brown, 2 to 3 minutes. Add mushrooms, bell pepper, oregano and pepper and cook, stirring often, until the vegetables are wilted and soft, about 7 minutes.
  2. Reduce heat to low; sprinkle the vegetables with flour and stir to coat. Stir in broth and soy sauce; bring to a simmer.
  3. Remove from the heat, lay cheese slices on top of the vegetables, cover and let stand until melted, 1 to 2 minutes.
  4. Divide the mixture into 2 portions with a spatula, leaving the melted cheese layer on top. Scoop a portion onto each toasted bun and serve immediately.
*To remove the gills from the underside of the mushroom, use a spoon to scrape them off (FYI - the gills are edible, but removed in this recipe).

**Lesson learned: scrape gently otherwise you will scrap half your mushroom off.  Sad lesson.

Wednesday, July 25, 2012

Bruschetta Chicken

Earlier this week we grilled 5 chicken breasts and stuck them in the fridge as an easy weeknight prep.  Simple to grill (all you need to do is season with salt and pepper) and you are good to go for a quick dinner prep... just a note, if you're going to take this approach - microwave the breasts (do not stick them back on the grill or in the oven otherwise it'll dry it out).

Now, I just had to think of ways to top the chicken breasts and change it up so we don't get bored.  In scoping Pinterest I saw a recipe for Bruschetta and *ding* there we go!  Talk about an easy and delicious dinner.

Side of green beans coated in Salt, Pepper, and a little Garlic Powder.
Ingredients
  • Chicken Breasts (2-4, depending on serving size)
  • 3 Tomatoes, Chopped
  • 1/2 - 1 Small White Onion, Chopped
  • 2 Garlic Cloves, Minced
  • 2 tbl Fresh Basil, Chopped
  • 1 tsp Olive Oil
  • 1 tsp Balsamic Vinegar (I added a little extra because I love this combo)
  • Salt/Pepper
Directions
  1. Coat chicken with salt and pepper and cook in a pan for 3 minutes on each side (over medium heat).  Remove from pan.
  2. Coat pan with 1 tsp of olive oil.  Once hot, throw in the chopped onions until they become transparent (3-4 minutes).  Add garlic for an additional 1 minute.
  3. Lower the heat to Medium-Low and add tomatoes, basil, balsamic vinegar, and S&P.  (This step is just to warm the mixture so you don't want to cook it too much longer).
  4. Top chicken with Bruschetta Topping and enjoy!  As you can see from the picture, we had a side of green beans and it was the perfect combination.
Overall this is a great, simple dinner for a weeknight as it only takes 20-30 minutes tops to prepare.  Plus, can you really go wrong with anything basil?!

Sunday, July 22, 2012

Drunk Mushroom Chicken

Dinner last night was a go-to favorite in this household.  While I love calling it "Drunk Mushroom Chicken" in all actuality it's just a White Wine, Mushroom Sauce that is absolutely delicious.  Easy to make because there aren't that many ingredients - this recipe takes a total of about 45 minutes to make (prep time included).  The recipe below is for 2 servings, but adjust accordingly for family portions.

Not the most accurate (or enticing) picture, but to be fair this was my first experiment with the dish.  It has since gotten a lot tastier.
Ingredients

  • 2 chicken breasts
  • 1 cup of sliced mushrooms (I used Baby Bella)
  • 1 small onion, chopped
  • 1 clove garlic, minced
  • Olive oil (I used as a spray to coat the pan)
  • 1/2 cup white wine
  • 2/3 cup low-sodium chicken broth
  • 2 tbl sage
  • 1 tbl oregano
  • salt
  • peper

Directions
  • Season chicken with salt and pepper.  In a pan, spray (or pour) olive oil and cook the chicken on each side for 3 minutes.  Remove from the heat and keep covered to keep the chicken warm.
  • In the same pan, add more spray and place the onions and mushrooms over heat for 4-5 minutes.  Then, add the garlic for 1 additional minute.
  • Pour the broth and wine in, along with the spices, and let simmer for 15 minutes (or until sauce has reduced).  For the final 5 minutes place the chicken back in the saucepan.
  • Serve with side and enjoy!
Notes
  • We like to serve this with either bread or quinoa to soak up the additional sauce and steamed veggies.  (In retrospect, a great option would be asparagus).

Monday, July 2, 2012

Summer Bean Salad (w/Shrimp)

Ok, so I officially have a go-to summer treat for you readers!  I found this recipe from the magazine Eating Well's 2010 summer edition and let me tell you, it is tasty.  The perfect light meal for a hot day - this fills you up with the protein from the beans and the lightness of the olive oil/lemon dressing keeps you from feeling bogged down.  The best part - it honestly takes no more than 30 mins to make.  (You know that's an uber-win in my book).  This honestly doesn't even need the shrimp so don't let that scare you away from trying it!


Things to note:

- In my opinion the salad itself can stand on it's own.  It's seriously that good.  Optional idea would be to add quinoa to bulk it up.  I have to give credit to Chris for this one as the boy has become obsessed with the stuff.  It really was a good idea.

- We cut the recipe in half to accommodate for just Chris and I (plus lunch tomorrow), but the recipe below makes 6 servings.  Keep that in mind and cut the recipe in half if need be.

- The original recipe calls for White Beans (aka Canelli Beans) but I only had black beans in my pantry.  Both would clearly work, so pick your preference.

- Try your best to use fresh herbs, but keep in mind dried herbs work just as well.  I ended up using dried herbs, but I can't wait to try it with fresh ingredients.

- Last but not least, while the original recipe calls for a grill I just cooked my shrimp in a pan.  It turned out just as well.  I may or may not have underestimated the amount of shrimp we would eat... keep in mind I wouldn't touch the stuff before I changed my diet so I'm still learning here.  (And yes, Mom, I do eat... *Tangent alert*  As a child I was one picky eater.  As in I would only eat hamburgers... even at a Mexican restaurant.  As a result, I still get shock from my family when I eat food that isn't in the form of a patty covered in ketchup.  Anyway.....)


Ingredients:
  • 1 teaspoon finely grated lemon zest
  • 1/3 cup lemon juice
  • 3 tablespoons extra-virgin olive oil
  • 2 tablespoons packed fresh oregano, minced
  • 2 tablespoons packed fresh sage, minced
  • 2 tablespoons minced fresh chives
  • 1 teaspoon freshly ground pepper
  • 1/2 teaspoon salt
  • 2 15-ounce cans cannellini beans, rinsed
  • 15-20 cherry tomatoes, quartered
  • 1/2 white onion, chopped
  • 1 cup finely diced celery
  • 24 raw shrimp (21-25 per pound), peeled and deveined
Directions:
  1. Combine lemon zest, lemon juice, oil, oregano, sage, chives, pepper and salt in a large bowl. Reserve 2 tablespoons of the dressing in a small bowl. Add beans, tomatoes, onions, and celery to the large bowl; toss well.
  2. Preheat grill to medium-high or place a grill pan over medium-high heat until hot.
  3. Thread shrimp onto 6 skewers. (If using a grill pan, you don’t need to skewer the shrimp.)
  4. Oil the grill rack or the grill pan. Grill the shrimp until pink and firm, turning once, about 4 minutes total. Serve the shrimp on the white bean salad, drizzled with the reserved dressing. 


Saturday, June 9, 2012

Authentic Thai Curry

So for those who don't know, I have a slight obsession with Thai food.  Give me a good curry and I am such a happy camper.  Yesterday, at the last minute I decided to change my dinner plans (once again disappointing Chris a little as I had gotten his hopes up with trying a Sloppy Joe recipe... in my defense I wanted to make homemade buns, which need to be made overnight.  And for the record, the bread turned out so tasty so that will be coming up).

Ok, enough with the tangent - so this started by being based off a Chocolate Covered Katie recipe (and no, sadly it was not covered with chocolate), but as I went and changed things around it really did take a life of it's own.  That being said, when I tell you I overestimated the amount it would make... well, that may be an understatement (a severe understatement).  This ended up being enough to feed an army.  The recipe below is adjusted slightly from what I made so there are more reasonable portions, so make sure you taste as you go to get the right balance of spices.  The spicy sauce is complemented by the sweetness of the sweet potato.  As Chris put it, this could be served in a restaurant and you wouldn't think twice.

Ingredients


  Sauce


All my spices lined up nice - OCD, much?
  • 4 tbl curry powder
  • 1 1/2 tsp paprika
  • 1/2 tbl sage
  • 1 tbl coriander
  • 4 heaping tbl tomato paste
  • 1 1/2 c cocunut milk
  • 1/8 tsp salt
  • 1 T garlic
  • Optional - I added a dash of garlic powder for an extra kick of garlic
  • Handful Spinach (chopped)
  • Handful Kale (chopped)
  • 2 Bell Peppers, diced
  • 1 Onion, diced
  • 3/4 Cup Cauliflower - Steamed
  • 3/4 Cup Green Beans - Steamed
  • 1 Roasted Sweet Potato
  • 3/4+ C Chicken Broth (try for the no to low sodium)
  • Optional - Black Beans or Grilled Chicken Cubed
  
Directions

  1. To begin, prepare the veggies - wrap the sweet potatoes in foil and stick them in the oven at 400 degrees (preheat optional).  Steam the cauliflower and Green beans and set aside.
  2. In a small saucepan, add the first 8 ingredients and mix well.  Set on low and let the flavors meld together over the heat 
  3. In a separate pot or wok (make sure it's big enough to combine all the ingredients in), sauté the peppers, onions, spinach, and kale.
  4. Cut the sweet potato into cubes and add to the peppers with the green beans, cauliflower, and onions.  [This is where you'd add the chicken or black beans].  Cover with the sauce and add chicken broth to mixture.  Stir well and keep over very low heat.  Let it sit until ready to serve.
I will say, it tastes better than this picture gives credit for.


Tuesday, June 5, 2012

"I Can't Believe It's Cauliflower Crust" Individual Pizzas

Ok, so here's the trickster in me coming out a little - last night I may or may not tricked Chris into trying cauliflower pizza with veggie cheese, and it was certainly a hit.  It's actually been my favorite main dish so far!


This is another one of those recipes I've heard whispers about..  Being a little skeptical is perfectly natural when your talking about a pizza crust made with cauliflower.  Like, really, this seems like just one of those "healthy" alternatives that doesn't live up to the original.  WRONG!  I can assure you I will not be making pizza with normal crusts thanks to the blog DashingDish.com (love her and her tasty noms).

So last minute I decided to change up dinner (after Chris had gotten his hopes up for meatballs), so he was not a happy camper.  What was I going to do though... there was cauliflower that was about to go bad in the fridge?  The tricky part (besides being cauliflower of course), however, is using Veggie Cheese.  That's right, you read correctly - Veggie Cheese: grated parmesan and mozzarella.  You seriously can not tell the difference.  I promise.  ...and no, this is not one of those fake promises where it's only half true.


As we were cooking the crusts, I realized, "Oh wait... pizza has toppings doesn't it?  Well, what do I have around the house?"  I pulled together a quick red sauce using tomato paste and sauteed onions, peppers, garlic, spinach, and kale (there would have been mushrooms in there too if I had some in the fridge).  Wow, just wow.  Check out the recipe below to recreate the goodness:

Cauliflower Pizza Crust [w/veggie toppings]


Ingredients


  • Crust
    • 2 cups Cauliflower (about half a head)
    • 1/8 cup Egg White
    • 1/4 cup Shredded Mozzarella*
    • 1/4 cup Parmesan Cheese*
    • 1/2 tsp Dried Oregano
    • 1/2 tsp Dried Basil
    • 1/4 tsp Garlic Powder
    • 1/8 tsp Salt
  • Toppings
    • Red sauce (homemade or premade)
    • Additional Mozzarella
    • 1 bell pepper of choice, cut into 1 inch pieces (I prefer red bell peppers for this recipe)
    • 1 onion, chopped in bite size pieces (as if you were putting it on the skewer)
    • 1+ cup spinach
    • 1+ cup kale
    • 1/2 tsp olive oil (just enough to coat bottom of pan)
*As I mentioned before, I used veggie cheese that I found by the tofu.  I love it because I cannot tell a difference taste wise, and you get more bang for your [nutritional] buck - your wallet [or price conscious significant other... cough*Chris*cough) may not be as happy.


Directions

  1. Preheat oven to 425 degrees and line a baking sheet with parchment paper or oiled foil.
  2. After cauliflower has been washed and cut in half, break it into segments and place it in the food processor until it reaches a rice-like consistency.  Place that in the microwave for 8 minutes (no need to cover or add water or anything).
  3. Add the cheese and seasoning and let the cauliflower cool (I put it in the fridge to speed up this process).  Once cooled, add your egg whites as a binding agent.
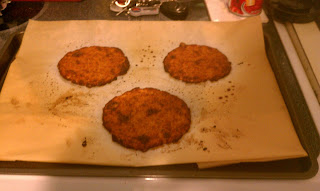
  4. Scoop into 3 separate crusts on cookie sheet (it should be about 1/4th inch think) and bake for 30 minutes.
  5. While it was baking, I made the sauce and toppings.  For toppings, I put the peppers in a covered pan and let them go for 4-5 minutes without touching it (harder than it looks).  Then add onions, garlic, kale, and spinach to pan and let cook down.
  6. When you're ready remove crusts to add sauce, cheese, and toppings of coice.  Place back in the oven for a few more minutes to melt the cheese and voila.  Tastiness.
Classic Nom Face.

Friday, June 1, 2012

Tandoori Chicken with a Twist

A while ago I found this recipe in Cooking Light for Tandoori Chicken.  This is another one I've been wanting to try so in advance of my mini-dinner party this Sunday, I used Chris (the bf) as a guinea pig once again - like you'll really find him complaining about that one.

First was the marinated chicken made a couple of nights ago... 

Takes a few hours to marinate, but oh so worth it.
(all I had were yellow peppers,
but red peppers would make this so much more colorful)
Then I decided to finish it off with a side dish of roasted peppers, tomatoes, and onions (and a little rice too.  To pump up the rice from just plain boring brown rice, I added spinach a little bit of ground ginger and cumin).

I think this dish turned out so tasty - I will definitely be making this one again!  Great idea for leftovers too: cut up the chicken and throw it on a wheat wrap with spinach, tomatoes, and onions.  It's even better the second day!


Serves 4.  (1 Chicken Breast per Serving)


Ingredients

Tandoori Chicken
  • 1 cup plain Greek yogurt
  • 1/4 cup grated onion
  • 1 1/2 1 tablespoons grated ginger
  • 1 tablespoon ground cumin
  • 1 teaspoon ground red pepper
  • 1/2 teaspoon ground tumeric
  • 5 garlic cloves, minced
  • 4 skinless, boneless chicken breasts (I prefer the thin cuts)
  • 1/2 teaspoon kosher salt
  • 1 tablespoon canola (or olive) oil
Roasted Peppers
  • 1 1/2 medium onions
  • 1 bell pepper
  • 10 cherry tomatoes (Optional)
  • 1 tablespoon olive oil
  • 1/2 tablespoon balsamic vinegar
  • 1/2 tsp cumin
  • 1/2 tsp paprika
  • Brown rice


Directions
  1. Create a marinade by combining the first 7 ingredients in a bowl, mixing well.  Put the yogurt mixture and chicken in a plastic ziplock bag and leave in the fridge for 2+ hours.
  2. Remove chicken after done, and grill for 6 minutes on each side (or until done).
  3. Chop peppers and onions into wedges.  (Optional, slice cherry tomatoes in halves). In a pan, add olive oil and balsamic vinegar.  When hot, add peppers and spices.  Cover with lid and allow to cook for 3 1/2 minutes.  Add onions and tomatoes to mixture and cook for an additional 3 minutes.
  4. Serve with rice and devour the thai goodness.
*Credit goes to cookinglight.com (Recipe found in May 2012 edition).